Closet organization may not be one of the easiest ways to organize, but I can guarantee that it will be the most rewarding. Ever since organizing our two full-sized closets, getting ready in the morning and even the dreaded putting away laundry have become less of a chore. Plus, no longer do I cringe when I open the doors to my husband’s closet. Below are the steps to make designing your custom closet space as painless as possible.
Step 1: Take an inventory of what’s in your closet now and how you currently store those items.
Are you a hanger or a folder? Do you have a shoe addiction or are purses and belts your weaknesses? These are important questions to ask when getting started. Take note of whether you need more room to hang dresses, fold jeans, store purses, stack shoes, store a hamper, etc. Keep this in mind as you move through the process.
Step 2: Measure all closets even if they look to be the same size and be sure to account for space taken up by closet doors.
Our closets are side-by-side, but actually have very different widths and depths, so it was important to measure both. We also had sliding doors that were a key factor in deciding what we can actually fit in the space. Not sure what to measure? I recommend Easyclosets.com, which shows you exactly what you need to measure.
Draw your closets on a piece of paper with the measurements noted, as shown below. Keep this handy for when you start to shop closets.
Step 3: Build your closets…virtually.
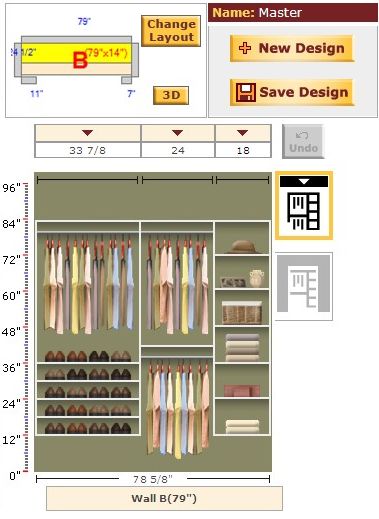
Grab your measurement paper from Step 2 and your inventory from Step 1 and log onto a website to start building your closet. I find Easyclosets.com to have the best virtual closet software and if you’re so inclined, you can order exactly what you build with the help of a personal consultant.
Design your closet based on size and storage needs. Sketch the design on your measurement sheet or print your design. That way, if you do shop it in a store, you’ll have a record of the pieces you need.
Step 4: Start with the basics.
If you shop your closet organization design at a big box hardware store, try to start with a closet organizer kit. I recommend the ClosetMaid ShelfTrack Closet Organizer Kit with Shoe Shelf ($129 - $139). These are only available for certain styles, but they’re a lot easier and less expensive to start with. Add more pieces to the base design as needed to achieve your custom closet.
If you prefer a style not available the kits available in-store, do some online searching to see if you can find it elsewhere or just use the kits available as a guide for the individual pieces you’ll need for your preferred style.
Step 5: Keep calm and carry on.
Building the closet in-store can be overwhelming. Be prepared to spend some time. There are a lot of pieces and parts to consider. Just keep referring back to your design and stay focused on one section of the closet at a time. Remember that if you forget something you can always go back.
Lastly, if you choose a wire framed closet (like we did) you’ll probably need to cut down lengths of shelving to create certain sections of the closet. If you do this in-store make sure your design is solid or you’ll end up cutting pieces you don’t need. And don’t be afraid to ask an Associate to do it for you! You can also do this at home with a standard bolt cutter. If you don’t have one, they can be bought for $15 - $20 at any hardware store.
Step 6: It’s time to build
Start by drawing the design on the wall of your closet in pencil. The wall anchors needed to create the closet must hit a stud. Use a stud finder (everyone should have one of these) to decide where your lines should go. Your custom closet will cover these lines or you can paint over them later if they really bother you. Once the lines are in hang the anchors and start building out your custom closet. If it isn’t obvious: FOLLOW THE INSTRUCTIONS included with your kit or materials. It seems simple, but this is one of the few organization projects I advocate that is a lot of work. Spend the time to get it right.
If you don’t have the patience or the skill, get someone to do this entire step for you. I have the eye for design, but could not put screw to drill to create it. My husband was the brawn behind my brain and I thank him immensely for that!
Step 6 is deceiving short, so getting to the point of enjoyment will be well-deserved.
 Our 'his' closet took on a very different form than the 'hers'. It didn't require nearly as much room for clothes or shoes, but did need extra space to separate work clothes (clean and dirty) from casual clothes. The right-side of the closet is dedicated to shelving for clean work clothes and sweaters as well as a tall, open floor space that stores a hamper for dirty work clothes which have to be kept separate from other laundry.
Now that it’s properly organized the 'his' closet also allows for storage of other household items, like an extra laundry basket, ironing board, guest pillows, and our tennis rackets.
We ultimately replaced our sliding, mirrored closet doors with the folding style (Home Depot; $30/each) to allow for more space.
 By including two rows of hanging rods, a short shelving area, and a tall area capable of holding 7 shoe shelves; we were even able to organize my ever-expanding closet. The added floor space now neatly holds yet another laundry basket (yes, between the two of us we have four laundry baskets that tend to be full!), a gym bag, and yes, even more shoes.